Question 4
A forced response obeys The solution is continuous at the forcing switch; the differential equation is solved classically on each side. On any grid use .
Tasks
Compute Euler values on grid A: .
Compute Euler values on grid B: . Use the specified value of at the switching node.
Derive the exact solution by matching the two phases and compare the two absolute endpoint errors.
Draw both Euler polygons and the exact solution. Explain why including the switch is important, yet does not guarantee the smaller endpoint error for these particular grids.
Show solutionHide solution
Question 4 – Solution
Strategy. Distinguish resolving an event from controlling the numerical error made within each phase.
Step 1: Compute grid A. The step lengths are . Left-node evaluation gives The second step continues using across an interval whose forcing actually changes partway through.
Step 2: Compute grid B. The step lengths are . Thus At the prescribed forcing is , so the final step uses the new phase.
Step 3: Obtain the correct comparison value. The exact phase solutions are They agree at the switch and satisfy their respective equations. Consequently so the absolute errors are .
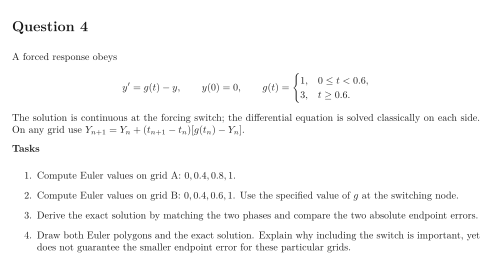
See the diagram in the original worksheet below.
Step 4: Explain the apparently better unaligned grid. Grid A undercounts the switched forcing, while grid B uses it correctly but takes a larger last step and overestimates the concave-down response. Here A happens to have the smaller endpoint error. Event alignment removes a known forcing mismatch, but does not order total errors on different coarse grids. Accurate computation also requires sufficiently small steps within the smooth phases.